ACH Setup – Participants and Batches
The procedure below will provide step-by-step guidance in setting up an ACH participant. It will also provide instructions on how to create and initiate an ACH batch. You can download these instructions using the “Download” button above.
Creating an ACH Participant:
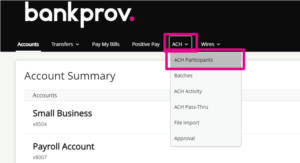
- Once logged into your online profile, click on the ACH tab.
- If your organization currently utilizes RSA Tokens, input the token from your mobile device or hardware token. If you do not utilize tokens, you will automatically be redirected to the ACH tab.
- Click the Participants tab.
- Click

- Type the requested information. Items marked with an asterisk (*) must be entered prior to saving the beneficiary.
- Name: The legal name on the account that the funds will credit.
- Email Address: Email Address for the participant (this will allow the participant to be notified once the ACH has been downloaded).
- Nickname: Any description that will help you identify the participant.
- Institution Name: Full name of the participant’s Financial Institution.
- Routing Number: The Routing/ABA number provided by the participant.
- Unique Identifier: Used to help track the participant.
- Account Number: Full Account Number for the participant.
- Account Type: Checking, Savings, or Loan.
- Status: Set to Active.
- Once all necessary information for your participant has been entered, click Save.
- A confirmation message will appear at the top of the screen indicating the participant was successfully added.

Creating an ACH Batch:
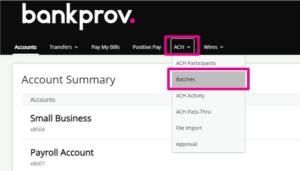
- Under the ACH tab, click the Batches tab.

- Click

- Fill out the batch details.
- Batch Name: Any name to describe the reason for payment (example: Payroll).
- Transaction Type: Select the applicable option below.
- PPD Credit: used for sending a payment to a Person.
- CCD Credit: used for sending a payment to a business.
- PPD Debit: used for pulling funds from a person.
- CCD Debit: used for pulling funds from a business participant.
- Company Discretionary Data: This is seen by the person/business that the ACH is sent to. Can include invoice numbers, payroll dates, etc.
- Company Entry Description: Additional description for reason of payment. Usually the same as the batch name.
- Company: Select the name of the business from the drop down. If you have more than one business name that you initiate ACH with, select the desired business name.
- Offset Account: Account number that the ACH will be funded with. *If you have more than one business name that you initiate ACH with, ensure that the account selected matches the Company name selected.
- Click Add Participants.
- Check off the participants that you would like to add to the batch.
- Once all participants have been selected, click Add Selected Participants.
- Input the amount.
- Click Save and Close to complete the batch.

Initiating an ACH Batch:
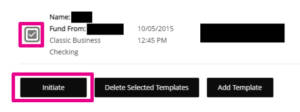
- Click on the ACH tab, then batches.
- Check off the applicable batches, then click Initiate.

- If your organization does not currently utilize RSA Tokens, a Text or Call Verification is required. Select your delivery preference and once you receive the code, input in on the screen in online banking.
*If your organization utilizes RSA Tokens, the Text/Call Verification is not applicable to you and you may disregard that step in this procedure.
- If your organization has Single approval, the ACH batch has been initiated and will be processed shortly.
- If your organization has Dual-Approval entitlements in place, a secondary user with Approval authority will be required to log into their online profile and approve the ACH batch. Until this step is completed, the batch is considered pending and will not be sent. Once all necessary approvals are completed, the ACH batch is successfully initiated and will be processed shortly.
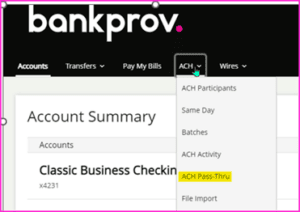
Using ACH Pass-Thru
- Once logged into your online profile, navigate to an ACH Tab, click on drop down and choose ACH Pass-thru
- You must have NACHA format file saved in one of your computer folders. Select the necessary file and click upload.
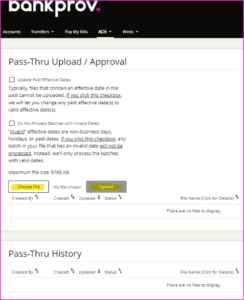
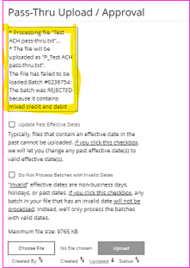
- You will receive a notification (See highlighted) with the status of the file.
Cutoff Times
Domestic wires and ACH transactions must be received by the Bank by the following times in order to be posted same-day. Any Wire and ACH transactions after these times will go out/post to accounts the next business day.
Online Banking Users
| Same Day ACH | Standard ACH | Wires |
| 2:00pm ET | 5:00pm ET | 5:00pm ET |
API Users
| Same Day ACH | Standard ACH | Wires |
| 9:45am ET | 7:15pm ET | 5:00pm ET |
| 1:45pm ET | — | — |
| 4:00pm ET | — | — |
Wire & ACH Fraud
ACH transaction and wire transfer security is critical. The best defense against potential fraud is to implement a strong information security program.
Download our Wire & ACH Fraud Prevention Tips